| © D.J. Ferdinand
published in ANVIL Magazine, April 1998 There is one particular kind of knife that says, by its very nature, it was made by a blacksmith. It is forged from a single piece of 5160 spring steel. The knife has a blade, handle and finger guard made of one piece of steel. It is light, strong and fits the hand well. I call it a flint striker knife because the design was used by some of those hardy Souls We call mountain men as a way of starting their fires. The handle portion of the knife was struck with a piece of flint and the resulting sparks aimed at a small handful of tinder. Its rustic good looks make it a welcome addition to a "possibles" bag, and a fine patch knife. The first step is to locate the steel. GM uses 5160 in their coil springs and most scrap yards can supply one for a few dollars. I recommend buying a new spring, if you can afford one. Springs that have seen a few hundred-thousand miles of hard road can develop stress fractures that may only show tip after you have spent hours of forging, grinding and polishing. This will usually happen as the red-hot blade is quenched in the oil bath. The resulting ping! will ruin Your day. I start with a section of a spring that is at least 1/2" in diameter. This will make a small knife, but I like to use 5/8" stock for a slightly wider blade. The billet is cut from the spring with an abrasive cutoff saw with the ends ground to a convex shape. This will prevent the edges of the billet folding inward as you forge the point of the blade and the tip of the handle. 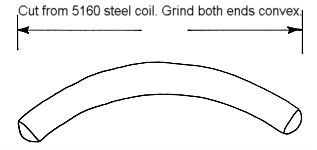
I start the blade by forging an obtuse point on one end. If the stock is forged flat first, the blade will tend to fold down the middle when the point is forged in. Once the point is in place, the section that will be the blade is widened with blows from a cross-peen hammer. As the blade is widened, the point section is refined to its final shape. When the blade looks like it is nearly to the shape that I would like, I begin smoothing it with a finishing hammer. Once the blade is shaped to my satisfaction the handle is drawn out. When I have a lot of heavy drawing to do I use a straight peen hammer for most of the work. Many smiths like to use the anvil horn for this work, but my Peter Wright rings in a minor key when struck hard on the horn and it drives me right up the wall. When the small piece of the original billet behind the blade section is fully drawn out, the overall length of the piece will be about 12 inches. The elongated tang section should have a graceful taper from the choil to its tip. I like to leave a small bulb at the tip so that it can be flattened into a smooth finger guard. The blade is held at the edge of the anvil and the choil is defined with firm and accurate hammer blows. This is one area where hammer control is important. This transition of blade to handle should be clean and well defined. 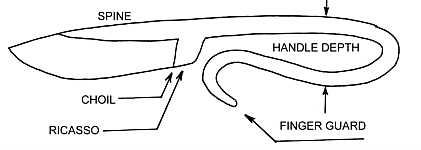
I use a small swage die to round the top of the tang section so that it is more comfortable in the hand. If you are only making one or two knives or you don't want to make a special die, the back of the tang can be rounded on a grinder. This will leave deep scratches that need to be polished out, so I find a swage die to be a good and inexpensive alternative. The small bulb at the tang is now flattened to form a smooth and comfortable place for the finger to rest, and hammered around the tip of the anvil's horn to form the finger guard. The whole tang is brought to a red hear and placed over the anvil's horn at the middle of the tang. With light, rapid hammer blows, it is wrapped around the tip of the horn to form the handle. If we were looking at an old chart from the early days of world exploration, this part would be labeled: "Here there be dragons." Only experience or experiment will tell you where to make that bend. Let the blade cool to a black heat before you cool it in the slack tub. Test how well it fits the hand. Make sure there is enough room in the finger guard for a comfortable grip. If the grip is too deep, it will cause hand fatigue when dressing that trophy bull elk next year. It should not be so shallow that it can't be gripped firmly. You now have a knife shape with a flat blade. The edge bevels can be ground into the blade or forged in place. If you decide to forge the bevels in, you should understand that it will change the shape of the blade as it is now. As the edge is hammered thinner, the opposite side of' the blade will curl away from the hammer. You can place the spine of the blade on the anvil and tap it back into shape, or use the shape it has acquired, if you like it. Use an equal number of hammer blows on each side of the blade to avoid any forged-in stress. When you feel that the piece has reached the level of refinement you desire, it should be annealed. In my shop, the piece is placed into the gas furnace and when it reaches the proper temperature, the furnace is shut down and allowed to cool. When removed from the furnace a few hours later, the knife is dead soft and can be ground and polished to the desired finish. The knife is heat treated by bringing it to the critical temperature and quenching it in oil. The proper temperature is best gauged by testing it with a magnet. When the knife is no longer attracted to the magnet, it should be quenched. If you don't have heat-treating oil, ATF (automatic transmission fluid) should work fine. Be Sure to do a test of the quench medium on a piece of your steel before you trust Your hard work to it. The knife is now polished and checked for stress cracks and other imperfections. Look carefully for tiny cracks at the edge. If this happens, you may have ground the blade too thin before quenching. I like to leave the edge with at least 1/32" thickness when I heat treat to prevent this mini-disaster. I temper 5160 by placing it in my kitchen oven at 450 degrees for about one hour. This leaves a blade that is tough, but holds a respectable edge. 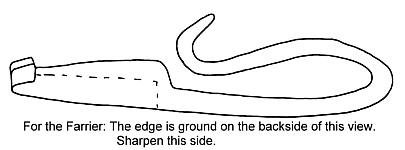
There are many variations on this simple knife. By leaving the point of the knife flat and wrapping the tip around a piece of round stock, it can be made into a hoof-trimming knife. Grind the bevels on the Outside of the curve and since I have always seen a farrier pull the knife rather than push it, the guard could be made to curl around the little finger. This is backwards to the handle on the usual knife, but seems to fit the occasion. The blade may want to be thinner as well, and this will contribute to the forging challenge. These are useful, simple, and, in their own way, elegant little knives. And I've made many of them. They can be made with long and slender blades or short and wide blades. Let Your imagination run wild. Make a lot of different styles - they make great gifts. Good luck, keep the hammer moving, and be careful. Return to the Blacksmithing Articles listing page. Return to the ANVIL Online Table of Contents for April, 1998.
|