Balance
© Jerry Jones
published in ANVIL Magazine, June, 1998
For years, I have read horse magazines that have addressed the question of balance. Each one was informative in its own right. However, when I would talk to farriers around the country, it seemed we had different ideas about the definition of balance.
It was several years ago, in the beginning of our breeding program, that a situation caused me to question my previous thinking. A mare was in labor with her first foal, and when I came on the scene, one leg protruding from the birth canal was the only thing visible. Until that point, I had assumed I could tell a front foot from a back foot. In this case, without seeing the rest of the horse, I did not know if the foal was coming out forward or backward. In this particular case, the foot was a front foot, and the foal was born once the head was in the proper position with the other front leg. The significance of this event put a question in my mind that continued to reappear for years to come.
At this point in the game, I was shoeing my own horses and anyone else's who was willing to pay me, and some who were not willing. My methods were simple: trim the foot to the pastern angle; level the foot from the bars forward, shoeing to the white line; and making sure that the nails were set in the shoe and were clinched high enough (about 3/4") they didn't pull out. The method worked well for 15 years. In those days, I had never seen a hoof gauge and the only angles anyone talked about were 50 or 55 degrees from front to back. Influenced mainly by halter horses, we would leave the feet a little longer on the inside, hoping that would straighten up a foot which might toe out some. Assuming this process was the best way to fit a horse with shoes, I continued for several years. During that time, I put shoes on horses in almost every situation -- from logging draft horses to endurance Arabians.
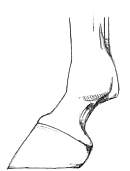
Several things seemed to reappear over time that became interesting to me. The first was the thickness of the hoof wall. The hoof wall would be thicker at the toe of the front foot than at the heel. In fact, the heel nails were always the hardest to get to come out correctly because of the straightness of the wall and the thinness of the heels.
Another phenomenon in some of these halter horses was that we had left the wall long, causing the side of the foot to become thicker and, in some cases, the opposite side would have little or no hoof wall. By this time in my shoeing practice, I was just shoeing out of my barn and not going out to customers, except on rare occasions. I kept about 30 of my own horses shod year 'round. Therefore, I was shoeing every day to keep our trail horses out on the trail carrying customers. I had the knowledge to keep a horse sound in rough terrain, and that was what I thought I was doing. However, I had all the same problems I'd always had, and stone bruises were costing me the most money. It was not rare to have as many as three horses down at any given time with a stone bruise. The average time a horse would be off the line, or out of work, was four to six weeks.
I had always found the bruise after it had abscessed, I would cut down into the abscess and drain it as much as possible. We would then try to treat it, but the results were a lame horse.
The first breakthrough to the stone bruising problem was a technique I learned from Bucky Hatfield, owner/operator of the Tennessee State Blacksmithing & Farrier School. Bucky cleaned out the abscess, packed it full of granulated iodine, poured it full of turpentine, and set it on fire. The fire would completely clean the infection and cauterize the wounded area. Then he packed the hoof with hoof packing, and placed a pad under the shoe. In addition, he sealed the hoof off with silicone to keep any dirt from getting back on the foot. Many times the horse would be sound and back on the line. We had solved the symptoms, but not the problem. My horses still had stone bruises, but now we knew how to fix them.
The next solution came to me in Texarcana, Arkansas, at a Brotherhood of Working Farriers (BWFA) convention. I was one of the speakers, along with Tony Gonzalez. Tony had written a book and had spoken about bony column alignment. His information made me look at the entire movement of the horse from the back forward and from the ground upward. I also began looking at the level of the hips and the shoulders. Tony's information also helped me to look at the feet from the back forward, and at ground level. I began seeing things I had never seen before. I realized the balance of the bony column related to the distance of the bars on the back of the hoof, and from ground level. In addition, the angle and toe length determined the movement and path of the foot. However, the total balance of the bony column depended upon the distance of all four feet from the ground to the back of the foot -- not the front.
As a breeder and horse trainer, I began looking again at my horses from a different angle -- from the back and from the ground. The first group that started me to thinking again were the foals. As a foal reaches two weeks old, I want to see it in open field with its mother on a warm morning right after I have turned them out of the barn. I sit down on a feed bucket and watch. It is one of the greatest pleasures I get as a breeder. In the past, I would look for balance in conformation and attitude, but mostly I would look for athletic ability. I watched to see what the foals liked to do. It's quite a show -- they will do flying lead changes, roll backs, circle maneuvers, sliding stops, and, if the ground is a little damp with dew, I watch them fall down a lot. I then began to see myself riding them as two-year olds. Unlike before, as I watched the foals, I was paying more attention to their feet. I found the feet all look the same, the bars from the front to the back were the same, the toe lengths were the same, and the angle was steep.
The next bit of information came in a roundabout way. An acquaintance of mine had received some old Army cavalry manuals on shoeing, which stated the cavalry had set all the shoes on 56°. True or not, I thought it was worth a try.
I had four or five two-year-olds, and I put them on 56° on all four feet. We also made the toe length 3 3/8" and the bony column the same from the ground to the bars. Medial-lateral angles were determined to be perpendicular to the cannon bone when the bone was held and let the foot relax. Where the toes were long and thick the shoes were set back, and the toe wall rasped down to the shoe. When we were finished, the colts looked as if they had grown the shoes themselves!
This technique was the beginning of a program that would solve most of our problems for years to come. Stone bruises went from a constant three to four to only three to four a year. Thickness in the toes or side of the hoof began to balance out.
Within the next several months we set all our horses on 56° on all four feet. The toe length was the same, with the bony column the same. (Many of the techniques of corrective shoeing we used to stop cross-firing, paddling or winging out. Now it was no longer necessary.)
In teaching this balance method, it is not a cure all, nor is it meant to be. It is a place to start, a place to move to, or a place to move away from, and a place to go to when trying to correct a problem you have little or no reference to.
At one time, I worked for six months trying to correct a paddling out of the right front foot on one of my young stallions. I tried everything everyone told me and nothing worked. Once shod on 56° on all four feet, and his feet trimmed to the perpendicular of his cannon bone with the toe length all the same, the paddling stopped. In addition, the colts we were starting had the ability to collect themselves and move with ease; that had not been possible before.
What happened to the stone bruises? First of all, a stone bruise forms where there is a primary and secondary impact. In the case of the front foot, especially the right front (where at least sixty-five percent of all our bruises occurred), the heel hits the ground first and rocks toward the toe. The heel hits and is the primary impact; as it rolls toward the toe, the toe becomes the secondary impact. A stone bruise occurs as the horse commits his weight to the primary impact, which gives him a false message -- the message that nothing is under his foot. As the horse rocks toward the toe and commits his total weight on that foot, the bruise occurs if a rock is in the path of the secondary impact. The secondary impact carries the weight of the horse, which will create a thicker toe if the impact is from back to front. If the other, it is from side to side. Then you will have a thin and a thick side to the foot. The thinness caused by the primary impact and the thickness caused by the secondary impact occurs when the bony column puts all the weight on the thickest part of the hoof. We experienced the same problem with the trimming of the halter horses in the past. Therefore, the secondary impact supported all the weight.
 This hoof shows thickness in the toe and thinness of the heels, indicating that the primary impact was on the heels and the weight of the horse's mass fell on the toe as the secondary impact. This enabled the growth of the toe to be produced thicker to support the greater amount of weight, making the individual foot out of balance to the body movement of the total horse. |
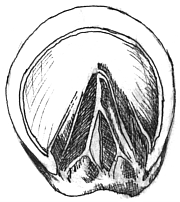
 Using the protractor set on 56°, this is what the foot angle would look like. The trained eye is the best tool for seeing balance in movement. Horses should be looked at before and after shoeing, moving at a walk and then at a trot, from front to back, then back to front, looking from each side. The more you look, the more you will see that, if horses did not move, they probably would not need shoes. |
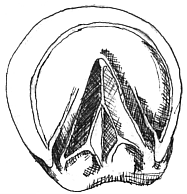
 By not knowing which side of the horse this foot came from, we see that the right side is the primary impact and then shifts to the secondary impact or left side, causing the hoof to grow thicker to the side that carries the weight. |
 This illustrates the theory that the distance of the bars from the ground determines the bony column alignment. |
The design of the horse's foot is to hit the ground flat from back to front. If the foot sets down flat on impact to the ground, and a rock happens to be there, the horse will not commit his weight. However, the horse will adjust his body weight to miss the stone; a limping motion will occur, but no stone bruise. The foot will grow even and straight down from the coronet band if the foot naturally hits the ground flat.
In addressing balance, we have all four feet on 56° and all toe length at 3 3/8". A hoof gauge and a small measuring tape can determine these measurements. If the bony column is normal, meaning the horse does not have a short cannon bone, we are halfway home. The next area of difficulty comes in medial-lateral training. How do we determine how to balance each individual hoof so that as the foot hits the ground, it is in perfect accord with the alignment of the bony column? This is where the experienced eye takes precedence over the gauges. The method is simple: Pick up the foot and let the weight of the foot rest on the cannon bone as you hold it with the inside hand. At this point, the bones of the foot, from the pastern down, are loose, and the hoof should fall in its normal position, as if it were moving. As you look down the cannon bone, you try to picture a perpendicular line across the foot that intersects with the cannon bone (the cannon bone should be perpendicular to the coffin bone), then trim the hoof to match that line. I had been shoeing for 17 years before I tried this method the first time. However, once I started using it to start colts, I began to see a difference in performance, movement, and the condition of the foot. It is not the place to stop, but it is the place to start when looking for the best way to go with your flat shoeing program.